Throwing the first normal passes: Difference between revisions
| Line 13: | Line 13: | ||
Throw one club back and forth. All passes go straight. When throws on one hand look good, practice passes from the other hand. |
Throw one club back and forth. All passes go straight. When throws on one hand look good, practice passes from the other hand. |
||
[[image:throwing-a-pass.png|thumb|upright=1.7|right]] |
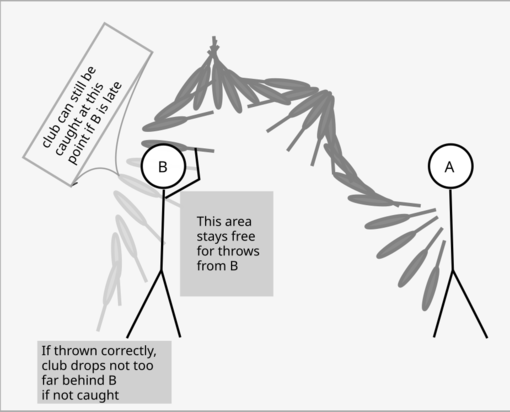
[[image:throwing-a-pass.png|thumb|upright=1.7|right| Juggler A passes a club to B. Intermediate positions of the club are shown.]] |
||
* Always hold an open hand as a target for the thrower at or a bit above shoulder height. The space between thumb and index finger should show upwards to receive the club. |
* Always hold an open hand as a target for the thrower at or a bit above shoulder height. The space between thumb and index finger should show upwards to receive the club. |
||
Revision as of 10:00, 24 February 2022
These are very simple exercises with few clubs to teach how to make good throws before there is a fixed pattern. Practice this at least some minutes until throws seem ok. Come back to doing this whenever you notice that your throws are getting a lot worse because of the additional stress.
One Club
Holding the club before a throw:
- hold the club and let your arm hang down relaxed
- roughly thumb or index finger shoud point forwards
- this is a good start position for a throw
- passes should go straight forward from this position and not curve inside to your middle
- try to come back to this relaxed hold whenever a hand is not not doing a throw (as happens in many of the early exercises)
Throw one club back and forth. All passes go straight. When throws on one hand look good, practice passes from the other hand.
- Always hold an open hand as a target for the thrower at or a bit above shoulder height. The space between thumb and index finger should show upwards to receive the club.
- stand relatively close together, nice high, "floaty" throws become harder on longer distances.
What to look for:
Throws should
- go quite a bit above head height, but come down to the catcher so they don't have to reach up very far
- touch the floor about 20-30cm behind the other person if not caught
- spin: club should still be horizontal at head height - so the club can be caught between head height and about waist height without being overspun
Posture/technique:
- hold the club in the middle of the handle. Neither at the knob nor at the middle of the club.
- hold the club, relax the arm and let both hang at the side
- arm and club should be a straight line. This is mostly the case when the region between thumb and index finger faces forwards
- let the club *hang* there. You should feel its centrifugal pull when you do the trow
- the club will turn on its own, don't add a lot of spin from your wrist, over time, that is bad for the wrists
- most of the motion for the throw should be in the elbow.
Note: nice high "floaty" throws that come down correctly are a bit more difficult to do than flatter "fast" throws, but they will make many of the following passing patterns easier for both sides and make more difficult patterns possible.
Three Clubs
Four hands, three clubs, one hand is always free. Switch roles so everyone gets to practice both throws. All throws go to the empty hand, each passer throws right - left - right - left …
Try to have a regular rhythm. Same things to look out as with one club.
When this goes well, increase the difficulty of one side - side A - by throwing the club at the same time as A. Person A throws to the empty hand, B throws to the hand that becomes free by that throw.
Next things to do
- If you have one more advanced passer who can do a solid 3-count and one beginner, do an assymetric n-count vs 1-count.
- If both of you can do a 3-club cascade, try 5-club 2-count
- if you are both beginning and also not yet strong with juggling 3 clubs, try 5-club 1-count or interved parsnip
- if you only have 3 clubs available, you can try 720 - zip-pass, but that is a bit more difficult than the previous patterns
